
Lightroom Editing Guides – Backgrounds, Masking & Color
Adobe Lightroom has become the backbone of digital photo editing, not only for professional photographers but also for social media creators and hobbyists. While the software offers a wide range of powerful tools, mastering its editing features requires guidance and practice. This is where detailed Lightroom editing guides prove invaluable.
In this article, we’ll cover everything from working with a Lightroom photo editing background, understanding how to replace or enhance a Lightroom editing background, using advanced Lightroom masking, experimenting with color grading Lightroom, and making efficient edits through Lightroom edit copy. Whether you’re a beginner or an experienced editor, these techniques will help you elevate your photography game.
Mastering Lightroom Photo Editing Background
The Lightroom photo editing background feature is one of the most effective ways to transform an ordinary shot into a visually striking masterpiece. Background adjustments can change the mood of an image, highlight the subject, or create a sense of depth that draws the viewer’s eye.
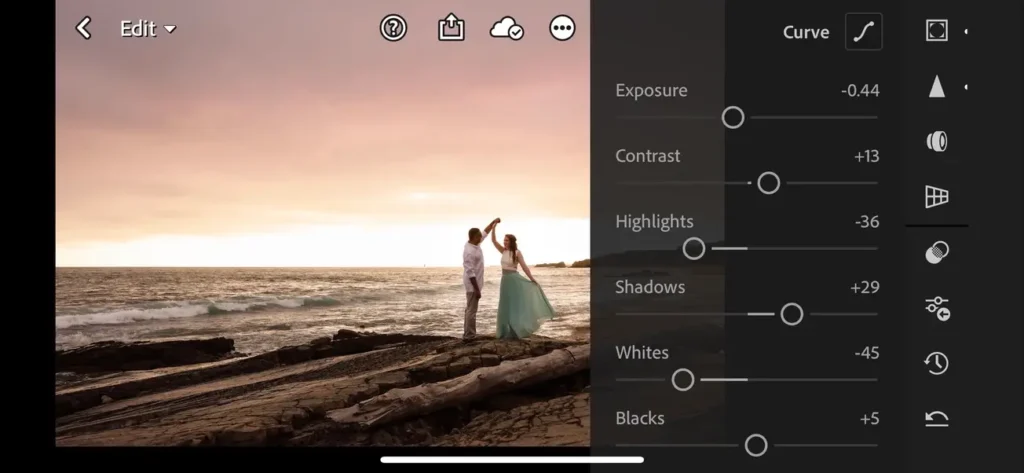
Using tools like the Brush, Radial Filter, and Graduated Filter, you can selectively lighten, darken, blur, or recolor the background while keeping your subject intact. For example, landscape photographers often darken the sky to add drama, while portrait photographers brighten the backdrop to emphasize the subject.
By combining background adjustments with selective edits and preset filters, you can create images that look refined and professional without the need for third-party apps.
Replacing and Enhancing Lightroom Editing Background
One common question beginners ask is how to handle a Lightroom editing background. Unlike Photoshop, Lightroom Editing Guides doesn’t allow you to completely replace a background, but it excels at enhancing it.
For instance, you can:
For users searching in Hindi or regional queries like Lightroom ka background, this means learning how to creatively manipulate existing backgrounds rather than cutting them out. Pairing Lightroom edits with other Adobe tools can give you full creative control while keeping Lightroom Editing Guides as your main workflow hub.
The Power of Color Grading in Lightroom
When it comes to storytelling through photography, few techniques are as impactful as color grading Lightroom. This feature allows you to adjust shadows, midtones, and highlights with different hues, giving your photos a cinematic or artistic finish.
For example:
Using HSL (Hue, Saturation, Luminance) sliders, combined with the Color Grading panel, you can fine-tune your edits to achieve anything from subtle natural looks to bold, dramatic aesthetics. For creators who love experimenting, color grading is a must-learn skill that can define their unique style.
Understanding Lightroom Masking
One of the most revolutionary tools in recent Lightroom Editing Guides updates is Lightroom masking. This feature allows you to isolate specific areas of your photo for precise editing. Instead of applying global changes, masking gives you control over highlights, shadows, or even the subject’s skin tones without disturbing the background.
Types of masks include:
With masking, you can brighten a face in a portrait, enhance the sky in a landscape, or even balance lighting across unevenly exposed areas. It’s one of the best ways to achieve professional-level edits while maintaining natural quality.
Using Lightroom Edit Copy for Efficiency
Editing hundreds of photos can be time-consuming, but Lightroom edit copy solves this problem. By copying settings from one photo and pasting them onto others, you can maintain a consistent style across an entire collection.
For example, wedding photographers can edit one photo from a ceremony and then apply the same adjustments to the rest of the set. This not only ensures visual consistency but also saves hours of manual editing.
With features like Sync Settings and Paste Adjustments, Lightroom becomes a powerful tool for batch editing. Pairing these with presets makes the workflow even faster.
Tips to Improve Your Lightroom Editing
To take your editing further, here are some related techniques and concepts that align with our main keywords:
By combining these LSI topics with your understanding of backgrounds, masking, and color grading, you’ll be able to produce high-quality edits that stand out across platforms.
Practical Example – Editing a Portrait Step by Step
Let’s apply what we’ve learned with an example:
This workflow ensures speed, consistency, and professional results.
Common Mistakes to Avoid in Lightroom Editing Guides
Even with powerful tools, beginners often make errors. Here are a few to avoid:
By practicing moderation and precision, your edits will maintain a natural and polished appearance.
Why Lightroom Editing Guides Matter
The world of photography is competitive, and to stand out, you need more than just a good camera. Detailed Lightroom editing guides provide the step-by-step knowledge to use tools effectively.
From working with a Lightroom photo editing background to experimenting with Lightroom masking, these guides empower both beginners and professionals to maximize Lightroom Editing Guides full potential. They also reduce the learning curve, making complex edits approachable.
Final Thoughts
Lightroom Editing Guides is not just about filters—it’s about precision and creativity. By mastering tools like Lightroom editing background, Lightroom ka background, color grading Lightroom, and Lightroom masking, you gain the ability to tell stories through your photos.
The addition of Lightroom edit copy makes workflows faster, while background and color adjustments elevate the visual quality of your images. Whether you’re editing portraits, landscapes, or creative projects, these guides ensure your photos are not only technically correct but also artistically inspiring.
With practice and the right guidance, Lightroom Editing Guides can become your most powerful creative companion.